Wednesday, October 28, 2015

How To Partition On A Pen Drive


How To Partition On A Pen Drive
҉҉҉҉҉҉҉҉҉҉҉҉҉҉҉҉   cmd.exe (it must be run as administration)
› diskpart
› list disk
› select disk 1 (which disk u needed to partition)
› clean
› create partition primary
› format fs=ntfs / FAT 32 quick
› assign
› exit

Friday, October 23, 2015

Remove Shortcut Virus

আমরা অনেকেই ইদানিং শর্টকাট ভাইরাসের জ্বালাতনে অতিষ্ঠ। অনেকেই পোস্ট করেন এটি রিমুভের বিষয়ে। এটা আসলে কোন ভাইরাস নয়, এটা একটি "VBS Script"।

শর্টকাট ভাইরাস স্থায়ীভাবে রিমুভের জন্য আপনাকে কয়েকটি ধাপ অনুসরণ করতে হবে।

অনাক্রান্ত কম্পিউটারের জন্য:


১. RUN এ যান।

২. wscript.exe লিখে ENTER চাপুন।

৩. Stop script after specified number of seconds: এ 1 দিয়ে APPLY করুন।

এবার কারো পেনড্রাইভের শর্টকাট ভাইরাস আর আপনার কম্পিউটারে ডুকবে না।

আক্রান্ত কম্পিউটারের জন্য:

১. কী বোর্ডের CTRL+SHIFT+ESC চাপুন।

২. PROCESS ট্যাবে যান।

৩. এখানে wscript.exe ফাইলটি সিলেক্ট করুন।

৪. End Process এ ক্লিক করুন।

৫. এবার আপনার কম্পিউটারের C:/ ড্রাইভে যান।

৬. সার্চ বক্সে wscript লিখে সার্চ করুন।

৭. wscript নামের সব ফাইলগুলো SHIFT+DELETE দিন।

৮. যেই ফাইলগুলো ডিলিট হচ্ছে না ওইগুলো স্কিপ করে দিন।

৯. এখন RUN এ যান।

১০. wscript.exe লিখে ENTER চাপুন।

১১. Stop script after specified number of seconds: এ 1 দিয়ে APPLY করুন।

ব্যাস হয়ে গেল আপনার কম্পিউটার শর্টকাট ভাইরাস মুক্ত। এবার অন্য কারো পেনড্রাইভের শর্টকাট ভাইরাস আর আপনার কম্পিউটারে ডুকবে না।

আক্রান্ত পেনড্রাইভের জন্য:

১. আপনার পেনড্রাইভটি কম্পিউটারের সাথে সংযুক্ত করুন।

২. এবার cmd তে যান।

৩. আপনার পেনড্রাইভের ড্রাইভ লেটারটি লিখে ইন্টার দিন। (যেমন: I:)

৪. নিচের কোডটি নির্ভুলভাবে লিখুন।

৫. কোডঃ attrib -s -h /s /d *.*

৬. ইন্টার কী চাপুন।

৭. এবার দেখুন পেনড্রাইভে রাখা আপনার ফাইলগুলো পুনরায় দেখাচ্ছে কিনা?

৮. এবার আপনার গুরুত্বপূর্ণ ডাটাগুলো রেখে পেনড্রাইভ ফরম্যাট করে দিন।

হয়ে গেল আপনার পেনড্রাইভ শর্টকাট ভাইরাস মুক্ত।


Monday, October 19, 2015

How to Install Windows 7 (Beginners)

Are you installing Windows 7? You don't need to be a professional or refer to a confusing manual in order to do so. Just follow this guide, and you'll have Windows 7 installed on that computer in no time!

Installing Using a Disc

Clean Install

A clean install is intended for users who want to freshly install Windows on their computer (by deleting all of the data on the hard disk and then installing Windows) or computers that do not have an operating system yet.

Enter your computer's BIOS. Turn off the computer that you want to install Windows on then turn it back on. When the BIOS screen appears or you are prompted to do so, press Del, Esc, F2, F10, or F9 (depending on your computer’s motherboard) to enter the system BIOS. The key to enter the BIOS is usually shown on the screen. 
 
Find your BIOS's boot options menu. The boot options menu of your BIOS may vary in location or name from the illustration, but you may eventually find it if you search around.
  • If you can't find the boot options menu, search the name of your BIOS (most likely located in the BIOS menu) online for help.
Select the CD-ROM drive as the first boot device of your computer.
  • Although this method may vary among computers, the boot options menu is typically a menu of movable device names where you should set your CD-ROM drive as the first boot device. It can also be a list of devices that you can set the order of their boot on. Consult a manual or the internet for help if you're stuck.
Save the changes of the settings. Press the button indicated on the screen or select the save option from the BIOS menu to save your configuration. 
Shut off your computer. Either turn off the computer by choosing the shut-down option in your current operating system, or hold the power button until the computer powers off. 
  • Insert the Windows 7 disc into your disc drive.
Start your computer from the disc. After you have placed the disc into the disc drive, start your computer. When the computer starts, press a key if you are asked if you would like to boot from the disc by pressing any key. After you choose to start from the disc, Windows Setup will begin loading.
  • If you are not asked to boot from the disc, you may have done something wrong. Retry the previous steps to solve the problem.
 
Choose your Windows Setup options. Once Windows Setup loads, you'll be presented with a window. Select your preferred language, keyboard type, and time/currency format, then click Next
  • Click the Install Now button
Accept the License Terms. Read over the Microsoft Software License Terms, check I accept the license terms, and click Next.
Select the Custom installation. 

Decide on which hard drive and partition you want to install Windows on. A hard drive is a physical part of your computer that stores data, and partitions "divide" hard drives into separate parts.
  • If the hard drive has data on it, delete the data off of it, or format it.
    • Select the hard drive from the list of hard drives.
    • Click Drive options (advanced).
    • Click Format from Drive options.
  • If your computer doesn't have any partitions yet, create one to install Windows on it.
    • Select the hard drive from the list of hard drives.
    • Click Drive options (advanced).
    • Select New from Drive options.
    • Select the size, and click OK.
     
Install Windows on your preferred hard drive and partition. Once you've decided on where to install Windows, select it and click Next. Windows will begin installing. 


Friday, October 16, 2015

Understanding Operating Systems

Computer Basics 

Understanding Operating Systems

What is an operating system?

An operating system is the most important software that runs on a computer. It manages the computer's memory, processes, and all of its software and hardware. It also allows you to communicate with the computer without knowing how to speak the computer's language. Without an operating system, a computer is useless.

The operating system's job

Your computer's operating system (OS) manages all of the software and hardware on the computer. Most of the time, there are many different computer programs running at the same time, and they all need to access your computer's central processing unit (CPU), memory, and storage. The operating system coordinates all of this to make sure each program gets what it needs.

Types of operating systems

Operating systems usually come preloaded on any computer you buy. Most people use the operating system that comes with their computer, but it's possible to upgrade or even change operating systems.
The three most common operating systems for personal computers are Microsoft Windows, Apple Mac OS X, and Linux.
The Windows, OS X, and Linux logos
Modern operating systems use a graphical user interface, or GUI (pronounced gooey). A GUI lets you use your mouse to click icons, buttons, and menus, and everything is clearly displayed on the screen using a combination of graphics and text.
The OS X GUI
The Windows GUI


Each operating system's GUI has a different look and feel, so if you switch to a different operating system it may seem unfamiliar at first. However, modern operating systems are designed to be easy to use, and most of the basic principles are the same.
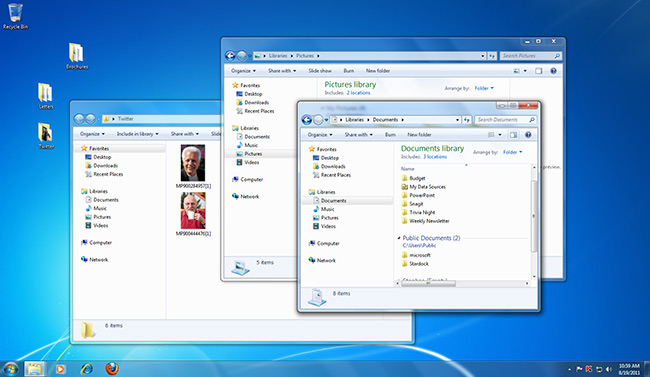


Microsoft Windows

Microsoft created the Windows operating system in the mid-1980s. Over the years, there have been many different versions of Windows, but the most recent ones are Windows 8 (released in 2012), Windows 7 (2009), and Windows Vista (2007). Windows comes preloaded on most new PCs, which helps to make it the most popular operating system in the world.
If you're buying a new computer or are upgrading to a newer version of Windows, you can choose from several different editions of Windows, such as Home Premium, Professional, and Ultimate. You may need to do some research to decide which edition is right for you.
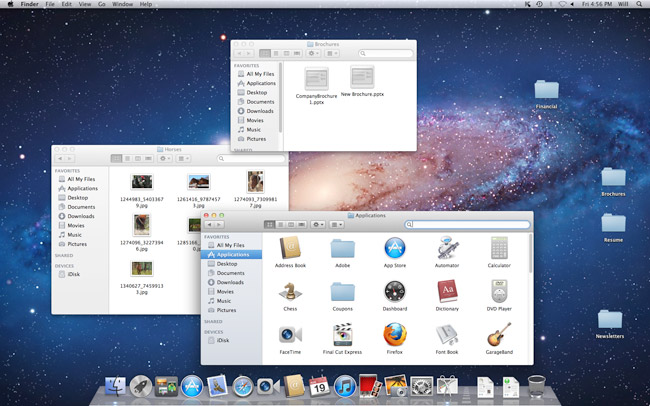
Windows 7


Mac OS X

Mac OS is a line of operating systems created by Apple. It comes preloaded on all new Macintosh computers, or Macs. All of the recent versions are known as OS X (pronounced O-S Ten), and the specific versions include Yosemite (released in 2014), Mavericks (2013), Mountain Lion (2012), Lion (2011), and Snow Leopard (2009). Apple also offers a version called Mac OS X Server, which is designed to be run on servers.
According to StatCounter Global Stats, Mac OS X users account for 9.5% of the operating systems market as of September 2014—much lower than the percentage of Windows users (almost 90%). One reason for this is that Apple computers tend to be more expensive. However, many people prefer the look and feel of Mac OS X.
Mac OS X Lion


Linux

Linux (pronounced LINN-ux) is a family of open-source operating systems, which means they can be modified and distributed by anyone around the world. This is different from proprietary software like Windows, which can only be modified by the company that owns it (Microsoft). The advantages of Linux are that it is free, and there are many different distributions—or versions—you can choose from. Each distribution has a different look and feel, and the most popular ones include Ubuntu, Mint, and Fedora.
Linux is named after Linus Torvalds, who created the Linux kernel in 1991. The kernel is the computer code that is the central part of an operating system.
According to StatCounter Global Stats, Linux users account for less than 2% of the operating systems market as of September 2014. However, most servers run Linux because it's relatively easy to customize.
Ubuntu Linux


Operating systems for mobile devices

The operating systems we've been talking about were designed to run on desktop or laptop computers. Mobile devices such as phones, tablet computers, and MP3 players are different from desktop and laptop computers, so they run operating systems that are designed specifically for mobile devices. Examples of mobile operating systems include Apple iOS, Windows Phone, and Google Android. In the screenshot below, you can see Apple iOS running on an iPad.
Operating systems for mobile devices generally aren't as fully featured as those made for desktop and laptop computers, and they aren't able to run all of the same software. However, you can still do a lot of things with them, like watch movies, browse the Web, manage your calendar, and play games.
screenshot of Apple iOS running on iPad


Computer Safety and Maintenance 01

Creating a safe workspace


Avoiding strain and injury

In addition to keeping your computer healthy, it's important to think about your own health. Using a computer involves a lot of repetitive motions such as typing and using the mouse. Over time, these motions can begin to take their toll on your body, especially your wrists, neck, and back. Staring at a monitor for long periods of time can also cause eye strain. To minimize this, you should take a few moments to make sure your workspace is arranged in a comfortable and healthy way.
Computer ergonomics is the science of equipment design and how specific equipment usage and placement can reduce a user's discomfort and increase productivity. Some equipment is designed with special attention to ergonomics, such as ergonomic keyboards and ergonomic chairs.
Here are a few tips to help you avoid injury in your workspace.
    An ergonomic keyboard
  • Adjust your chair: Make sure your chair is adjusted to allow you to sit in a natural, comfortable position. Many office chairs are specially designed to support the lower back and promote good posture.
  • Keep the keyboard at a comfortable height: Try to place the keyboard in a position that allows you to keep your wrists straight and relaxed to avoid wrist strain. Many desks have a keyboard tray that can keep the keyboard at a better height. You can also buy an ergonomic keyboard that is designed to minimize wrist strain.
  • Keep the mouse close to the keyboard: If possible, place the mouse right next to the keyboard. If the mouse is too far away, it may be uncomfortable or awkward to reach for it.
  • Place the monitor at a comfortable distance: The ideal position for a monitor is 20 to 40 inches away from your eyes. It should also be at eye level or slightly lower.
  • Avoid clutter: The computer area can quickly become cluttered with paper, computer accessories, and other items. By keeping this area as uncluttered as possible, you can improve your productivity and prevent strain and injury.
  • Take frequent breaks: It's important to take breaks while you're working at your computer. To avoid eye strain, you should look away from the monitor every once in a while. You can also stand up and walk around to avoid sitting in the same position for long periods of time. Programs such as Eyes Relax and Workrave can automatically remind you to take breaks 
 

Computer Safety and Maintenance

Protecting your computer

Safeguarding against malware

Malware is any type of software that is designed to damage your computer or gain unauthorized access to your personal information. It includes viruses, worms, Trojan horses, and spyware. Most malware is distributed over the Internet and is often bundled with other software.
The best way to guard against malware is to install antivirus software such as Bitdefender, Norton, or Kaspersky. Antivirus software helps to prevent malware from being installed, and it can also remove malware from your computer. New malware is being created all the time, so it's important to update your antivirus software frequently. Most antivirus programs can do this automatically, but you'll need to make sure this feature is enabled.
It's also important to stay smart when you're browsing the Web or using email. If a website or email attachment looks suspicious, trust your instincts. Keep in mind that your antivirus program may not catch everything, so it's best to avoid downloading anything that might contain malware.
Kaspersky antivirus


Backing up your computer

Imagine what would happen if your computer suddenly stopped working. Would you lose any important documents, photos, or other files? It may be possible to repair your computer, but your files may be lost forever. Luckily, you can prevent this by creating backup copies of all of your files (or just the important ones) on an external hard drive or an online backup service.

External hard drives

An external hard drive
You can purchase an external hard drive and copy the contents of your computer to it. The initial backup could take several hours, so you will need to select a period of time when you do not need access to your computer. Running the backup overnight usually works best. Follow-up backups should be conducted on a regular basis but will not take as long because the drive will only need to copy your most recent files.
Western Digital, Iomega, and Seagate produce popular external hard drives. Conduct some research on which product best suits your storage needs, or ask a computer sales representative for recommendations.
One drawback, compared to online backup services, is that your external hard drive can be lost, damaged, or stolen just as your computer might be. Therefore, it is important to keep your drive in a secure location when not in use.

Online backup services

You can also back up your files to one of the online backup services like Mozy, Carbonite, or Box, and your files will always be accessible to you. The amount of storage space provided by these sites varies, and you may have to pay a monthly or yearly fee for adequate storage. Again, do your research because these services are constantly changing and offer varying features.
One drawback to online backup services is that the initial backup can be slow and may even take days to upload if you have a lot of files. However, subsequent backups should not take as long.

Other maintenance techniques

Disk Cleanup
To keep your computer running smoothly, it's important to keep files and folders uncluttered. Cluttered or unorganized folders make it more difficult to find the files you need. Additionally, unwanted files can eventually fill up your hard drive, which will make your computer slower and more difficult to use. Here are a few things you can do to delete unwanted files and improve your computer's performance.
    Disk Defragmenter
  • Delete files: If you have any unwanted files, you can delete them manually. To do this, drag them into the Recycle Bin or Trash, then empty it.
  • Run the Disk Defragmenter: Windows includes a Disk Defragmenter program in the Control Panel. It scans the files on your hard drive and rearranges them so it can read them faster. If your computer is running slowly, running Disk Defragmenter can help to speed it up.
  • Run a Disk Cleanup: Windows also includes a Disk Cleanup program in the Control Panel. It scans your computer for temporary files and other files that can be deleted. You can then delete the files to free up space on your hard drive.


Keep your computer physically clean


Cleaning the computer case


Cleaning the keyboard

When dealing with computers, dust isn't just unattractive—it can potentially destroy parts of your computer. By cleaning your computer regularly, you can help to keep it working properly and avoid expensive repairs.

Cleaning the keyboard

A dirty keyboard doesn't look nice and can cause your keyboard to not work properly. Dust, food, liquid, and other particles can get stuck underneath the keys, which can prevent them from working properly. Check your owner's manual to see if the manufacturer has provided you with instructions for your specific keyboard. If so, follow them. If not, the following steps are basic cleaning tips that can help keep your keyboard clean.
  1. Unplug the keyboard from the USB or PS/2 port. If the keyboard is plugged into the PS/2 port, you will need to shut down the computer before unplugging it.
  2. Turn the keyboard upside down, and gently shake it to remove dirt and dust.
  3. Use a can of compressed air to clean between the keys.
  4. Moisten a cotton cloth or paper towel with rubbing alcohol, and use it to clean the tops of the keys. Do not pour alcohol or any other liquid directly onto the keys.
  5. Reconnect the keyboard to the computer once it is dry. If you are connecting it to a PS/2 port, you will need to connect it before turning on the computer.

Dealing with liquids

If you spill liquid on the keyboard, quickly shut down the computer and disconnect the keyboard and turn it upside down to allow the liquid to drain.

If the liquid is sticky, you will need to hold the keyboard on its side under running water to rinse the sticky liquid away. Then turn the keyboard upside down to drain for two days before reconnecting it. The keyboard may not be repairable at this point, but rinsing the sticky liquid off of it is the only chance for it to be usable again. The best way to avoid this situation is to keep drinks away from the computer area.

Cleaning the mouse

There are two main types of mice: optical and mechanical. Each is cleaned in basically the same way, although the mechanical mouse requires a bit more work.
    An optical mouse
    A mechanical mouse
  • Optical mice require no internal cleaning because there aren't any rotating parts; however, they can get sticky over time as dust collects near the light emitter. This can cause erratic cursor movement or prevent the mouse from working properly.
  • Mechanical mice are especially susceptible to dust and particles that can accumulate inside the mouse, which can make it difficult to track—or move—properly. If the mouse pointer does not move smoothly, the mouse may need to be cleaned.
Before you clean your mouse, check the owner's manual to see if the manufacturer has provided you with instructions for your specific mouse. If so, follow those instructions. If not, the following steps are basic cleaning tips that will help keep your mouse clean.
    Removing the tracking ball
  1. Unplug the mouse from the USB or PS/2 port. If the mouse is plugged into the PS/2 port, you will need to shut down the computer before unplugging it.
  2. Moisten a cotton cloth with rubbing alcohol, and use it to clean the top and bottom of the mouse.
  3. If you have a mechanical mouse, remove the tracking ball by turning the ball-cover ring counterclockwise. Then clean the tracking ball and the inside of the mouse with a cotton cloth moistened with rubbing alcohol.
  4. Let all of the parts dry before reassembling and reconnecting the mouse. If you are connecting it to a PS/2 port, you will need to connect it before turning on the computer.
If you want to give the mouse a quick cleaning, place it on a clean white sheet of paper and move the mouse back and forth. Some of the dust and particles should rub off onto the paper.


Cleaning the monitor

Dirt, fingerprints, and dust can make your computer screen difficult to read; however, it's easy to clean your screen when needed. Although there are monitor-cleaning kits you can buy, they may damage your monitor if they are designed for a different type of monitor. For example, a monitor cleaner that is designed for glass screens may not work with some nonglass LCD screens. The safest method is simply to use a soft clean cloth moistened with water.
Do not use glass cleaner to clean a monitor. Many screens have anti-glare coatings that can be damaged by glass cleaner.
    Wiping the screen
  1. Turn off the computer.
  2. Unplug the monitor from the power. If you are using a laptop, unplug the laptop.
  3. Use a soft clean cloth moistened with water to wipe the screen clean.
Do not spray any liquids directly onto the screen. The liquid could leak into the monitor and damage the internal components.


Tips for cleaning other computer surfaces

From time to time, you should clean your computer case and the sides and back of the monitor to avoid buildup of dust and dirt. Here are a few tips you can use when cleaning these surfaces.
  • Dust is your computer's main enemy. Use an antistatic wipe to lightly dust your computer casing. Don't use furniture cleaners or strong solvents.
  • Use a can of compressed air with a narrow nozzle to blow out debris from the air intake slots.
  • Spray cleaning solution—like diluted ammonia cleaner or glass cleaner—on a paper towel or antistatic wipe. Clean the monitor housing and casenot the monitor screen—by wiping in a downward motion.
  • A safe cleaning solution for computer surfaces—not computer screens—is ammonia diluted with water or glass cleaner comprised mostly of ammonia and water (check the label). The milder the solution, the better.

Keep it cool

Don't restrict airflow around your computer. A computer can generate a lot of heat, so the casing has fans that keep it from overheating. Avoid stacking papers, books, and other items around your computer.
Many computer desks have an enclosed compartment for the computer case. If you have this type of desk, you may want to position the case so it is not against the back side of the desk. If the compartment has a door, you may want to leave it open to improve airflow.


Monday, October 5, 2015

কম্পিউটার যখন–তখন বন্ধ হলে What we will Do??


কম্পিউটার যখন–তখন বন্ধ হলে

চালু কম্পিউটার কিছুক্ষণ পরপর হঠাৎ বন্ধ হয়ে আবার চালু (রিস্টার্ট) হয়, এমন সমস্যায় মাঝেমধ্যেই পড়তে হয়। এমনটা হলে বিচলিত হয়ে পড়েন ব্যবহারকারী। হতে পারে এটা সফটওয়্যারের কোনো সমস্যা কিংবা যন্ত্রাংশের সমস্যা। বেশির ভাগ সময় নিজেই এর সমাধান বের করা যায়। অন্তত ধারণা পাওয়া যাবে আসলে ঠিক কী কারণে এমন ঘটছে।
হঠাৎ করে কম্পিউটার বন্ধ হওয়ার সমস্যা কেন হচ্ছে, তা খুঁজে বের করতে Windows key + R চেপে রান প্রোগ্রাম চালু করুন। এবার sysdm.cpl লিখে এন্টার করুন বা ডেস্কটপের কম্পিউটার আইকনে ডান ক্লিক করে প্রপার্টিজে ক্লিক করুন। এখানে বাঁ পাশের Advanced system settings-এ ক্লিক করুন। দুই ক্ষেত্রেই সিস্টেম প্রপার্টিজ উইন্ডো আসবে।
সিস্টেম প্রপার্টিজ এলে Advanced ট্যাবে ক্লিক করে Startup and Recovery বোতামের নিচে Settings-এ ক্লিক করুন। নতুন উইন্ডো খুললে এর মধ্যে থাকা System failure অপশনের নিচে Automatically restart অপশন থেকে টিকচিহ্ন উঠিয়ে দিন। Write an event to the system log-এ টিক দিয়ে ওকে করুন। ফলে এখন থেকে কিছু হলেও হঠাৎ করে কম্পিউটার বন্ধ হয়ে আবার চালু (রিস্টার্ট) হবে না। কম্পিউটারে সমস্যা হলে কিছু লেখাসহ একটা নীল পর্দা দেখা যাবে। মাইক্রোসফট এটাকে স্টপ এরর বললেও উইন্ডোজ ব্যবহারকারীদের মধ্যে ব্লু স্ক্রিন অব ডেথ বা বিএসওডি নামেই ব্যাপক পরিচিত।
এই নীল পর্দা বা ব্লু স্ক্রিনে ভেসে থাকা লেখাগুলো থেকেই প্রাথমিকভাবে বোঝা যাবে কম্পিউটারে আসলে ঠিক কী সমস্যা হচ্ছে। সব লেখা পড়ে হয়তো বোঝা যাবে না, কারণ অনেক কারিগরি তথ্য থাকে। তবে পর্দার ওপরের দিক থেকে দ্বিতীয় অনুচ্ছেদে বড় করে থাকা লেখাটাই আসলে বেশি গুরুত্বপূর্ণ। এ লেখাটি কোথাও লিখে রাখুন।
এবার কম্পিউটার পুনরায় চালু করে গুগল অনুসন্ধানের মাধ্যমে ইন্টারনেট থেকে জেনে নিন এই কম্পিউটার ত্রুটির আসল কারণ কোনটি। এটা কি কোনো সফটওয়্যারের কারণে ঘটছে? সমস্যাটি র্যামের ত্রুটির কারণেও হতে পারে। আবার নতুন কোনো যন্ত্রাংশ ঠিকমতো ইনস্টল বা সমর্থন না করলেও এ রকম হতে পারে। মূল কারণ বের করে ফেললে সমস্যার সমাধান বের করা খুব একটা কঠিন হবে না, আশা করা যায়।

কম্পিউটার keyboard এর শর্টকার্টঃ

© F1: সাহায্য (Help);
© CTRL+ESC: Start menu চালু;
© ALT+TAB: চালু করা প্রোগ্রামগুলো থেকে বাছাই;
© ALT+F4: প্রোগ্রম বন্ধ করা;
© SHIFT+DELETE: সরাসরি ফাইল ডিলিট করা;
© Windows Logo+L: কম্পিউটার লক করা;
© CTRL+C: কপি;
© CTRL+X: কাট;
© CTRL+V: পেস্ট;
© CTRL+Z: আনডু;
© CTRL+B: অক্ষর বোল্ড করা;
© CTRL+U: অক্ষর আন্ডারলাইন করা;
© CTRL+I: অক্ষর ইটালিক করা;
© SHIFT+right click: অতিরিক্ত শর্টকাট সহ মেনু;
© SHIFT+double click: বিকল্প ডিফল্ট কমান্ড;
© ALT+double click: প্রোপার্টিজ প্রদর্শন;
© F10: মেনু বার চালু করা;
© SHIFT+F10: নির্বাচিত আইটেমের জন্যে শর্টকাট মেনু;
© CTRL+SHIFT+ESC: টাস্ক ম্যানেজার;
© ALT+DOWN ARROW: ড্রপ ডাউন মেনু খোলা;
© ALT+TAB: অন্য কোনো চালু করা প্রোগ্রামে যাওয়া ( সবগূলো প্রোগ্রাম দেখতে ALT চেপে ধরে TAB চাপুন );
© SHIFT: অটোরান বন্ধ করতে এটি চেপে ধরে রাখুন;
© ALT+SPACE: মেইন উইন্ডো’র সিস্টেম মেনু দেখা;
© CTRL+TAB: কোনো প্রোগ্রামের এক উইন্ডো থেকে অন্য উইন্ডোতে যাওয়া;
© ALT+আন্ডারলাইন কৃত অক্ষরঃ নির্দিষ্ট মেনুতে যাওয়া;
© ALT+F4: বর্তমান উইন্ডো বন্ধ করা;
© CTRL+F4: একাধিক ডকুমেন্ট ইন্টারফেস সহ কোনো প্রোগ্রাম বন্ধ করা;
© F2: নির্বাচিত ফাইল রিনেইম করা;
© F3: ফাইল খোঁজা
© F4: অন্য কোনো ফোল্ডারে ফাইল মুভ করা
© F5: বর্তমান উইন্ডো রিফ্রেশ করা
© CTRL+A: ফোল্ডারের সবগুলো আইটেম নির্বাচন করা
© BACKSPACE: পুর্ববর্তি ফোল্ডারে যাওয়া (ইন্টারনেট ব্রাউজারের ক্ষেত্রে পুর্বের পেইজ)
© Left ALT+left SHIFT +PRINT SCREEN: Toggles high contrast on and off;
© Windows Logo: Start menu;
© Windows Logo+M: সব প্রোগ্রাম মিনিমাইজ করা;
© SHIFT+Windows Logo +M: মিনিমাইজ আনডু করা;
© Windows Logo+E: Windows Explorer চালু করা;
© Windows Logo+F: Files অথবা Folders খোঁজা;
© Windows Logo+D: সব প্রোগ্রাম মিনিমাইজ করা;
© Windows Logo+TAB: টাস্কবার চক্রাকারে দেখা;
© Windows Logo+Break: System Properties ডায়ালগ বক্স চালু করা;
© Application key: নির্বাচিত আইটেমের জন্যে শর্টকাট মেনু;
© Windows Logo+L: উইন্ডোজ লগ অফ করা;
© Windows Logo+P: প্রিন্ট ম্যানেজার চালু করা;
© Windows Logo+C: কন্ট্রোল প্যানেল চালু করা;
© Windows Logo+V: ক্লিপবোর্ড চালু করা;
© Windows Logo+K: Keyboard Properties ডায়ালগ বক্স চালু করা;
© Windows Logo+I: Mouse Properties ডায়ালগ বক্স চালু করা।